Tuesday, January 10, 2012

My cure for an awful day.

Sometimes you just need to make yourself feel better, or more importantly your love when a bad day has been had.

What, you ask could make someones day better so much better?

Why cupcakes of course!!


Not just any cupcakes, but Banana cupcakes with Nutella frosting.
Yum. 
^_^


Banana Cake Recipe                          Directions
1 1/2 cups All-purpose flour                                     -Preheat oven to 350°
1 1/2 tsp Baking Powder                                    -Cream butter and Sugar together until fluffy
   1/2 tsp Baking Soda                  -In separate bowl mix Flour, Baking Powder, Baking Soda, and Salt
   1/4 tsp Salt                                               -Add Eggs + Vanilla to Butter/Sugar mixture
   3/4 cup White Sugar                                          -Add Flour mixture
1 tsp Vanilla                                                             -Add Bananas
1 Stick Unsalted Butter, softened
2 Eggs                                                                -Line pan with cupcake liners
3 Large ripe bananas, mashed                             -Evenly disperse batter
                                                                            -Bake for 25-30 Minutes


Now the frosting I made wasn't really frosting because I didn't have any powder sugar.
( I only realized this once I mixed the Nutella and Butter.. oh well it was still tasty.)
You could always just use straight up Nutella, or honestly the cake didn't even need anything it was so good.

Nutella Frosting                     Directions
2 TBS Softened Butter                              -Mix Butter and Nutella until evenly combined
 1/2 tsp Vanilla                                           -Add Vanilla
2 TBS Nutella                         -Mix Powdered Sugar, Salt, Cocoa powder together in separate bowl
1 1/2 cups Powdered Sugar                         -Alternate adding Milk and cocoa/sugar till smooth
1 tsp Cocoa Powder                                      -Now top that tasty cake with it
Dash o' salt
4 tsp Milk


The hearts in the picture are made from some fondant that I had laying around.

Now go spread some love!


Friday, December 2, 2011

Advent Calender

It never occurred to me that some people have never heard about these.
It is a German tradition that celebrates the anticipation of Christmas.
My Grandma and Grandpa used to send
my brother and I one every year. ♥
Mine had little chocolates in it.

I'm making my kiddo one,
that has activities to do.

I started with..
-A shallow box, about 2" deep.
-2 1/2 dozen egg carton
-Tape
-Razor knife


 It is way easier if you tape up the middle areas between the holes.
The tape the egg carton to the box.
THEN add the slips of paper.
It's all trial and error, lol.


Here is a calender I made for myself so that I can know what it happening each day.
Go ahead and love the Christmas fun.
^_^


Have some fun with it, do different things.
I made this one so I could keep using it year after year.


Sunday, November 27, 2011

Darth Vader Snowflake

Long time since a post, but this is fantastic.


I came across these Star Wars snowflake's that are just freaking great.
http://mattersofgrey.com/diy-star-wars-snowflakes/

The only problem I had was trying to figure out how to fold the paper.
Which is a pretty important part, so I made some instructions for such.


Start off by squaring off your paper.
Since I used regular printer paper you should cut off 2 1/2"

Cut it off, now you have a square.


Fold the square diagonally, like so.

Crease it.

Fold it in half again.

Crease it.


Now you will be making thirds.
Start by folding in the left side,

Now, fold the right side over.

When both are folded in this is what you get..

Just to help you out,
this is how it should look when you open it.

Now close it back up and
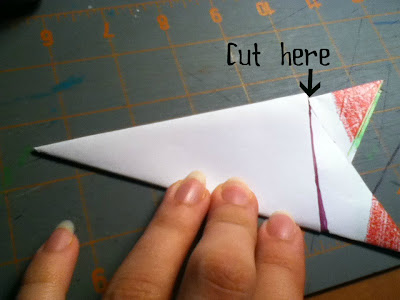
Trim off the fin parts.

Like so..

Now to draw on your picture.
Or you could print it off, whatever.

Make sure your open side is on left or things will not turn out as you want.


This part takes the longest, cut it all out.
I personally only used a razor knife.
Do what works for ya.


Unfold it all.... and.. TA DA!!


I just freaking love these.
You should make lots and hang them about.

I will be posting more DIY Christmas decorations throughout the month.
So check back.


Sunday, September 18, 2011

Carrot Cake

Even though my kiddo and I are awfully sick this weekend
I still managed to make Tommy's birthday cake.
That's love I tell ya.
^_^


I know, I know.. it looks soooo good, because it is!!

--------------------------------

Carrot Cake

  • 2-1/2 cups Self-Rising Flour
  • 2 tsp Baking Soda
  • 2 cups White Sugar
  • 2 tsp Cinnamon
  • 1 tsp Salt
  • 3 cups Grated Carrots
  • 1-1/2 cup Applesauce [or Oil]
  • 4 Eggs
  • 1 cup Nuts (I was all out of nuts, oh well)


- Directions-
  • Sift flour and other dry ingredients together
  • Beat applesauce + Eggs + Carrots
  • Fold dry ingredients into wet
  • Grease and flour 2- 9inch cake pans
  • 350° for 25 minutes (ish)


-----------------------------------------------
-----------------------------------------------

Cream Cheese Frosting                                                      

  • 1lb Powder Sugar
  • 1/2 stick butter (room temperature)
  • 1(8oz) Neufatel Cheese [Cream cheese] (room temperature)
  • 2 tsp Vanilla

 -Directions-

  • Cream Butter + Neufatel cheese + Vanilla
  • Gradually add powder sugar
  • ....and DANG! You have frosting.

-----------------------------------------------------------------------

Happy Birthday babe!!

Tuesday, September 13, 2011

In the works

SO!! It has been a loooong weekend, especially with the hubs sick.

I did successfully get my fabric in order and it looks lovely for sure.
With a kinda clean art room you should already expect this..
I have started a new project!


Not just some regular ol' project, but my favorite kind, Halloween!
I've decided to make a Countdown till Halloween calender.
Each day will have some sort of little craft or activity to do, and on Halloween he will get glow sticks! (for trick-or-treating of course)
I'm so thrilled, even though this will be an undertaking, lol.
This is what I have so far:


The last one will be super Halloween decorated.
But, you must be patient and I must get busy!

Hope your day is lovely!!

Saturday, September 10, 2011


Sleepover

Last night we had us a little boy sleepover!
They ran and tackled each other all night,
and slept all together in the living room watching movies.
Ahhhhh... I love seeing happy kiddos.

So, now is time to feed them!

So here is my favorite sleepover-breakfast-pancake-recipe!

Go ahead and say it... Yuuummmm...

..and yes that one is drowning in syrup, but that is what a 11-year-old boy's pancake looks like. (:


Ingredients

  • 1-1/2 cups milk
  • 1/4 cup white vinegar

  • 2 cups all-purpose flour
  • 1/4 cup white sugar
  • 2 teaspoons baking powder
  • 1 teaspoon baking soda
  • 1 teaspoon salt
  • 2 egg
  • 1/4 cup butter, melted
  • cooking spray


Directions

  • Combine milk with vinegar in a medium bowl and set aside for 5 min to "sour".
  • This makes buttermilk.
  • Combine flour, sugar, baking powder, baking soda, and salt in a large mixing bowl.
  • Whisk egg and butter into "soured" milk after it sets. 
  • Mix the flour mixture into the wet ingredients and whisk until lumps are gone. Make sure not to stir all the bubbles out, that is what makes them fluffy!
  • Now let it set for another 5 min. This helps the bubbles form to make them again... fluffy.
  • Heat a large skillet over medium heat, and coat with cooking spray.
  • Pour 1/4 cupfuls of batter onto the skillet, and cook until bubbles appear on the surface.
  • Flip with a spatula, and cook until browned on the other side.
  • Now smother in syrup or jelly.. or NUTELLA!